#1 Vue 컴포넌트 기본구조 이해하기
1.1view 파일에 basic.vue파일 생성
|
<template>
<!-- hteml코드 -->
<h1>Hello World!!</h1>
</template>
<script>
export default {
// 자바스크립트
}
</script>
<style scoped>
/* css */
</style>
|
1.2index.js 파일에 basic 부분 추가
|
import { createRouter, createWebHistory } from 'vue-router'
import Home from '../views/Home.vue'
//import Contact from '../views/Contact.vue'
const routes = [
{
path: '/',
name: 'Home',
component: Home
},
{
path: '/about',
name: 'About',
// route level code-splitting
// this generates a separate chunk (about.[hash].js) for this route
// which is lazy-loaded when the route is visited.
component: () => import(/* webpackChunkName: "about" */ '../views/About.vue')
}
3. ,{
path: '/contact',
name: 'Contact',
component: () => import(/* webpackChunkName: "contact",webpackPrefetch:true */ '../views/Contact.vue')
}
// {
// path: '/contact',
// name: 'Contact',
// component: Contact
// },
,{
path: '/basic',
name: 'Basic',
// route level code-splitting
// this generates a separate chunk (about.[hash].js) for this route
// which is lazy-loaded when the route is visited.
component: () => import(/* webpackChunkName: "basic" */ '../views/Basic.vue')
}
]
const router = createRouter({
history: createWebHistory(process.env.BASE_URL),
routes
})
export default router
|
3. App.vue파일에 router-link 넣어주기

1.3이번엔 자바스크립트를 이용하여 데이터 보일수 있도록 하기
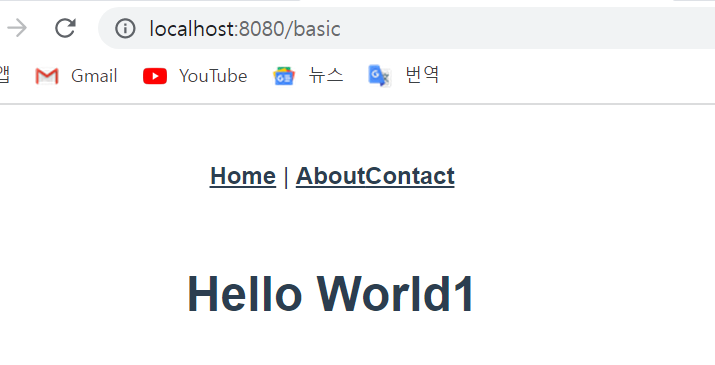
Baic.vue ==> <h1>{{title}}</h1> ,data부분 확인하기
|
<template>
<!-- hteml코드 -->
<h1>{{title}}</h1>
</template>
<script>
export default {
// 자바스크립트
name: '',
components: {},
data(){
return {
title : 'Hello World1'
}
}
}
</script>
<style scoped>
/* css */
</style>
|
//input 타입으로 테스트 <!-- v-model : Value와 유사 -->
|
<template>
<!-- hteml코드 -->
<div>
<h1>{{title}}</h1>
<input type="text" v-model="title" />
</div>
<!-- v-model : Value와 유사 -->
</template>
<script>
export default {
// 자바스크립트
name: '',
components: {},
data(){
return {
title : 'Hello World1'
}
}
}
</script>
<style scoped>
/* css */
</style>
|

-- Vue 장점 : 양방향 데이터 통신
# 2.Vue.js 부분 간단한 Templeate 세트를 미리 작성해 놓고 사용하는 방법 (snippet)
2.1.F1을 눌러 snippet을 검색하고, preferences를 누름
2.2.그 다음 vue 를 검색하여 vue.json을 클릭합니다.
2.3.vue.json 파일에 작성(기본적인것 셋팅해 놓음)
|
{
"Generate Basic Vue Code" : {
"prefix": "vue-start",
"body": [
"<template>\n\t<main>\n\n\t</main>\n</template>\n<script>\nexport default {\n\tname: '',\n\tcomponents: {},\n\tdata() {\n\t\treturn {\n\t\t\texample: '',\n\t}\n},\n\tbeforeCreate() {},\n\tcreated() {},\n\tbeforeMount() {},\n\tmounted() {},\n\tbeforeUpdate() {},\n\tupdated() {},\n\tbeforeUnmount() {},\n\tunmounted() {},\n\tmethods: {}\n}\n</script>"
],
"description": "Generate Basic Vue Code"
}}
|
2.4.vue 파일에서 vue-start 치면 나옴
# 3.원시HTML 데이터 바인딩
3.1. Vue파일 생성 (DataBindingHtml.vue)
v-html 태그를이용하여 html이 적용될수 있도록 함
3.2 router/index.js 추가 주소추가
|
<template>
<div v-html ="htmlString"></div>
</template>
<script>
export default {
name: '',
components: {},
data() {
return {
htmlString: '<p style="color:red;">This is a red string.</p>'
};
},
beforeCreate() {},
created() {},
beforeMount() {},
mounted() {},
beforeUpdate() {},
updated() {},
beforeUnmount() {},
unmounted() {},
methods: {}
}
</script>
|

# 4. 입력폼 데이터 바인딩
4.1 input Text 부분을 활용
4.1.1dataBindingInputText.vue 생성 후 router/index.js에 주소추가
v-model을 이용한 데이터 바인딩
|
<template>
<input type="text" v-model="example"/>
</template>
<script>
export default {
name: '',
components: {},
data() {
return {
example: 'South Korea',
};
},
beforeCreate() {},
created() {},
beforeMount() {},
mounted() {},
beforeUpdate() {},
updated() {},
beforeUnmount() {},
unmounted() {},
methods: {}
}
</script>
|

4.2 number일경우, textarea 사용
v-model을 사용했을 경우 문자열로 인식 v-model.number 일경우 숫자로 인식
|
<template>
<div>
<input type="text" v-model="example" />
<input type="number" v-model.number="example2" />
<textarea v-model="example3"></textarea>
<div>{{example3}}</div>
<!-- v-model을 사용했을 경우 문자열로 인식
v-model.number 일경우 숫자로 인식 -->
</div>
</template>
<script>
export default {
name: '',
components: {},
data() {
return {
example: 'South Korea',
example2: 12,
example3: '안녕하세요.'
};
},
beforeCreate() {},
created() {},
beforeMount() {},
mounted() {
// console.log(example2); //이렇게 했을 경우 에러
console.log(this.example2);
},
beforeUpdate() {},
updated() {},
beforeUnmount() {},
unmounted() {},
methods: {}
}
</script>
|

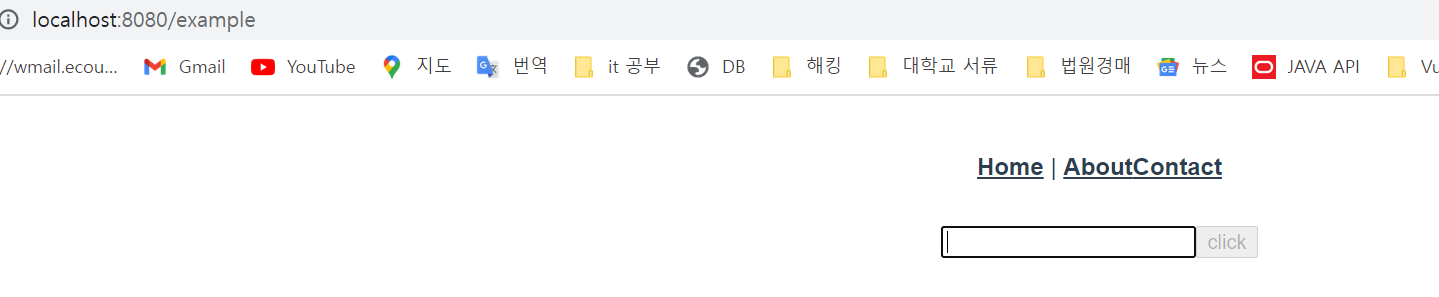
#5. 속성에 데이터 바인딩 하기
5.1 Example.vue 파일 생성
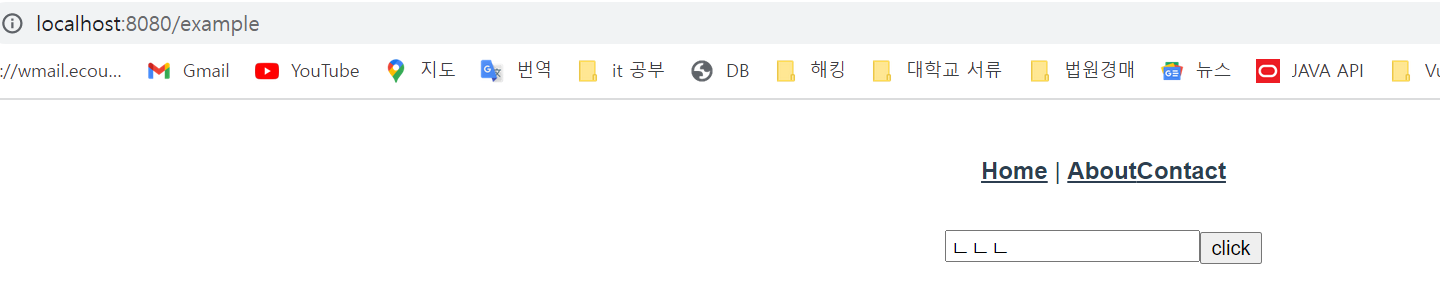
5.2 v-bind:disabled="textValue==''" 조건식을 주어 값이 없을 경우는 disabled 가 되도록 함
|
<template>
<div>
<!-- <img v-bind:src="url" style="height:100px;width:auto;"/> -->
<input type="text" v-model="textValue" />
<button type="button" v-bind:disabled="textValue==''">click</button>
</div>
</template>
<script>
export default {
name: '',
components: {},
data() {
return {
textValue:''
}
},
beforeCreate() {},
created() {},
beforeMount() {},
mounted() {},
beforeUpdate() {},
updated() {},
beforeUnmount() {},
unmounted() {},
methods: {}
}
</script>
|
#6. 클래스 데이터 바인딩 하기
<div class="container" v-bind:class="{'active':isActive, 'text-red': isBlue}">Class Binding </div>와 Data 부분 확인
|
<template>
<div class="container" v-bind:class="{'active':isActive, 'text-red': isBlue}">Class Binding </div>
</template>
<script>
export default {
data() {
return {
isActive : true
,isBlue : true
};
}
}
</script>
<style scoped>
.container{
width:100%;
height: 200px;
}
.active {
background-color: yellow;
font-weight: bold;
}
.text-red{
color: blue;
}
</style>
|

#7. 리스트 랜더링
'Dev > Vue.js' 카테고리의 다른 글
| [Vue 프로젝트 06] 간단한 조회화면,저장화면 (0) | 2022.02.13 |
|---|---|
| [Vue 프로젝트 05] Vue 컴포넌트 개발 2 (0) | 2022.02.08 |
| [Vue 프로젝트 03] 메뉴 구성(Router,Lazy Load) (0) | 2022.01.16 |
| [Vue 프로젝트 02] Vue 프로젝트 생성 (0) | 2022.01.14 |
| [ Vue 프로젝트 01] 개발환경 구성 (0) | 2022.01.14 |